[IOS] UITableView(2)
UITableView
<이전 포스팅>
2022.12.02 - [IOS] - [IOS] UITableView(1) - UITableView의 기본 구조와 개념
[IOS] UITableView(1) - UITableView의 기본 구조와 개념
UITableView https://developer.apple.com/documentation/uikit/uitableview Apple Developer Documentation developer.apple.com UITableView는 여러개의 Cell을 가지고 있고 하나의 열과 여러 줄의 행을 지니고 있으며 수직으로만 스크
hyukji.tistory.com
이번 포스팅에서는 UITableView를 직접 만들어 보고자 한다!
먼저 스토리보드에 TableView를 추가해주자. 필자는 constraints를 모두 0으로 맞춰 화면에 가득차게 만들어 주었다.
그 다음 ViewContoller 파일에 해당 테이블 뷰와 데이터를 작성해주었다.
import UIKit
class ViewController: UIViewController {
@IBOutlet weak var tableview: UITableView!
override func viewDidLoad() {
super.viewDidLoad()
}
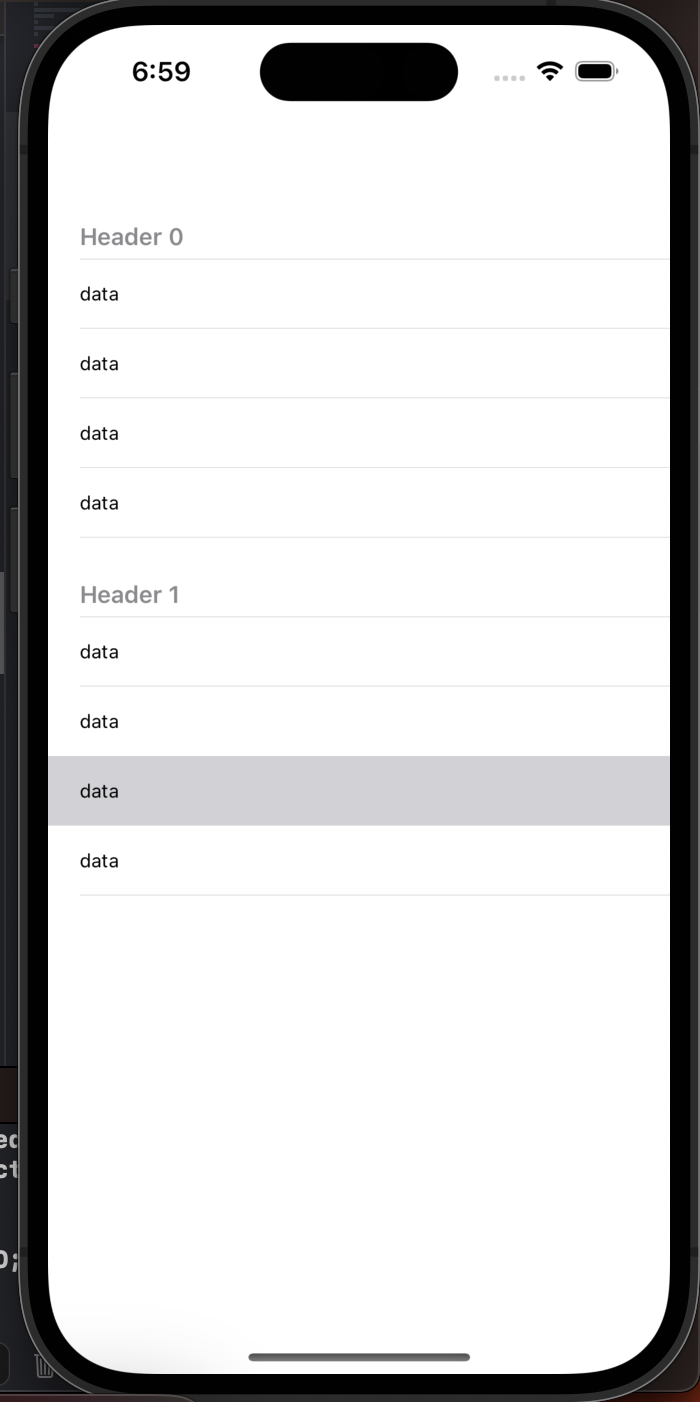
var datas = [["data", "data", "data", "data"], ["data", "data", "data", "data"]]
}
자 그럼 이제 테이블뷰에 데이터를 넣기 위해 테이블 뷰의 datasource를 설정해주자! viewDidLoad()에 다음과 같이 작성해 주면 된다!
import UIKit

class ViewController: UIViewController {

    @IBOutlet weak var tableview: UITableView!

    override func viewDidLoad() {
        super.viewDidLoad()
        self.tableview.dataSource = self
        // Do any additional setup after loading the view.
    }

    var datas = [["data", "data", "data", "data"], ["data", "data", "data", "data"]]

}
그러면 'Cannot assign value of type 'ViewController' to type '(any UITableViewDataSource)?'와 같은 에러가 뜰거다. 왜냐하면 해당 클래스가 UITableViewDataSource를 상속하지 않았기 때문이다. 상속을 시켜줄 텐데 조금 더 깔끔해서 작성하기 위해
extension을 사용해 테이블 뷰 관련된 함수만 따로 정리하자.
extension ViewController : UITableViewDataSource{

}
이전 포스팅에서 말했듯 데이터소스는 numberOfRowsInSection, cellForRowAtIndexPath 두 가지 매서드를 필수로 포함해야한다. 에러를 클릭해 fix를 누르면 자동으로 포함된다. 우리는 section을 하나만 가지고 있는 게 아니기 때문에 numberOfSections와 titleForHeaderInSection 매서드도 추가해 주었다.
extension ViewController : UITableViewDataSource{
    func numberOfSections(in tableView: UITableView) -> Int {
        <#code#>
    }

    func tableView(_ tableView: UITableView, titleForHeaderInSection section: Int) -> String? {
    	<#code#>
    }

    func tableView(_ tableView: UITableView, numberOfRowsInSection section: Int) -> Int {
        <#code#>
    }

    func tableView(_ tableView: UITableView, cellForRowAt indexPath: IndexPath) -> UITableViewCell {
        <#code#>
    }
}
그렇다면 이제 매서드를 채워보자! section의 개수는 datas의 배열의 개수와 같고, 해당 섹션의 개수는 datas[섹션번호] 의 개수와 같다. 각 섹션의 header는 "Header (해당 섹션번호)" 로 설정했다.
func numberOfSections(in tableView: UITableView) -> Int {
    return self.datas.count
}

func tableView(_ tableView: UITableView, titleForHeaderInSection section: Int) -> String? {
    return "Header \(section)"
}

func tableView(_ tableView: UITableView, numberOfRowsInSection section: Int) -> Int {
    self.datas[section].count
}
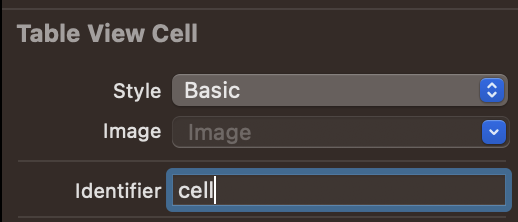
이제 마지막 cellForRowAt함수이다. 이 함수는 해당 row에 넣어줄 cell를 반환해주면 된다. 먼저 이전 포스팅에서 봤던 dequeueReusableCell 매서드를 살펴보자. 이 매서드는 identifier로 만족하는 TableViewCell을 모양을 가져오고 indexPath를 통해 해당 위치에 cell을 넣는다. 먼저 스토리보드로 넘어가 TableView의 prototype Cells의 개수를 올려주고 해당 TableViewCell의 identifier을 "cell"로 바꿔주자.
let cell = tableView.dequeueReusableCell(withIdentifier: "cell", for: indexPath)
원하는 cell 모형을 가져왔으니 안을 채울 데이터를 가지고 오자. indexPath는 section과 row로 이루어진 배열이다. 따라서 우리가 원하는 data는 indexPath.section안의 indexPath.row번째 data이다.
let data = self.datas[indexPath.section][indexPath.row]
다 끝났다! 이제 이 데이터를 cell에 넣어서 반환해주면 된다.
func tableView(_ tableView: UITableView, cellForRowAt indexPath: IndexPath) -> UITableViewCell {
    let cell = tableView.dequeueReusableCell(withIdentifier: "cell", for: indexPath)

    let data = self.datas[indexPath.section][indexPath.row]
    cell.textLabel?.text = data

    return cell
}
이제 실행해보자!
사실 UITableView에는 다양한 기능들이 있다. editmode부터 순서바꾸기 기능 등 대부분이 매서드로 들어있다. 그걸 전부 포스팅하기에는 무리라고 생각해 기본적인 틀까지만 만들었다. delegate 사용법 또한 datasource와 똑같다. viewDidLoad() 매서드에서 테이블 뷰의 델리게이트를 설정하고 상속해주면 된다! 아마 다음과 같은 형태로 작성될 것이다.
import UIKit

class ViewController: UIViewController {
    override func viewDidLoad() {
        super.viewDidLoad()
        self.tableview.dataSource = self
        self.tableview.delegate = self
    }

    ...

}

extension ViewController : UITableViewDataSource, UITableViewDelegate{
    }

    ...

}
테이블 뷰와 관련해 datasource와 delegate의 더 많은 기능들과 매서드들을 원한다면 공식문서에서 참고바란다!
https://developer.apple.com/documentation/uikit/uitableview
Apple Developer Documentation
developer.apple.com